There are those gamers who prefer to buy their games with die cut counters and there are those gamers who don't mind mounting counters, cutting them out, and enjoying the fruits of their labor while applying band-aids.
I am one of those. I have enough scars from slicing off finger tips (true stories), cutting hands and plain just looking like one was in a tiff with Miss Loretta who did not argue, but would just tell you, "don't make me cut ya".
I have developed my own way of mounting and cutting out counters thru out the years, and what tools I use. It may not be perfect, but it works for me. Heed the warnings:
✋ WARNING!!!! GO SLOW!!! Neither this blog nor myself will be held accountable for your actions or lack of ability. Know your limitations.
With the warnings out of the way, here is how I mount and cut out counters:
Background on the different tools used and why:
- 12" steel rule
- 18" steel rule
- utility knife (aka "U.K.")
- glue stick (GS) or 3M spray glue
- X-Acto with #11 blade (not used by me)
- a cutting mat - 11"x17" and/or larger
- backing for the counters: white, 24 lb (I use Ultra Pro Magazine Size Board for comics. Acid free and THIN!)
The 12" ruler has a rubber backing on it (rubberized electrical tape, I put on) to keep it from slipping. The 18" ruler has a cork backing, but I only use it when I have 11"x17" game maps to cut out, as the cork is aprx 1/32" of a stand off and sometimes the ruler will slip a little bit, not allowing a perfect cut. While the rubber backing on the 12" rule grabs, doesn't slip and is thinner.
The U.K. is used instead of a #11 X-Acto type knife blade, because, I have big hands and can hold it easier. The blades on the U.K. are not any wider than the #11 blade and to me is safer to use.
One can use either a glue stick or 3M Adhesive spray. Though to be honest, the 3M spray requires one to be outside and goes everywhere (nothing like having arm hair stuck together). The glue stick is easier to use, especially inside a house and holds everything as well as the 3M spray. I tend to buy 10 of them at a time when they are on sale for school supplies (50 cents for a BIG stick).
And most important, a self healing cutting mat. My first mat was 11"x17" in size and perfect for smaller 8.5"x11" size projects. I recently bought a larger cutting mat as my projects are getting larger, bigger than letter size, almost 11"x17" in size. Save yourself some money and buy a larger one. You will use it sooner or later. :)
BE CAREFUL!
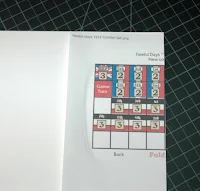
Here is the counter sheet I am going to mount. It is a set of replacement counters that I made for a WWI pocket game, called "Fateful Day 1914". It isn't very large and has both a front side and back side to it, with fold lines.
Since the fold lines are visible, fold to crease the paper on the "fold line".
Once the paper has been folded, coat the backside with the glue stick.(I use the purple kind to easily see where I miss spots :) ) then line it up and press it down, lining up the front and back correctly. In this case, if the lines are folded, it can be glued on both sides and glue from one of the edges, as this lines everything up correctly.
Here are both sides glued down. Don't mind the wrinkle as it's outside of the area needed. As long as there is no wrinkle in the counter art or project, everything is good.
Let it dry for 10 mins or so. And rub it down!!!
Note: Some printing paper used will require longer drying times and possibility of being put under a weight for a few hours. You won't know until you mount.
I am using a new protection product after mounting the counters but before cutting them out, Krylon Low Odor Clear Finish, Matte as a permanent, protective coating. This protects the counter better from wear. Why this one brand? Very low odor, and cleans up my hands and spray tip with soap and water. Easy to use.
👉 When using a protective spray such as this product shake, rattle, and roll the can for several minutes! Important to get everything mixed. Spray a very light coat, let dry, and then spray another one. I usually spray 3 light coats as one doesn't want this clear coat to run and cause problems.
✋ Don't forget to let it dry for several hours between coats and before cutting out.
👉 If you use such a product be sure and test it on your counter sheet BEFORE using on everything. As a wood worker, I have ruin a couple of finishes by using a clear spray product to protect the wood and finish without testing it out first. And be sure to let your ink dry before coating!!!
✋ WARNING: Line up your ruler and make 2 or 3 light cuts. NEVER bear down heavy and try to cut thru in 1 cut. You will probably ruin your cut and possibly hurt your self.
Remember to go slow, keep finger tips out of the way and keep the blade as straight up and down as you can. Be Careful!
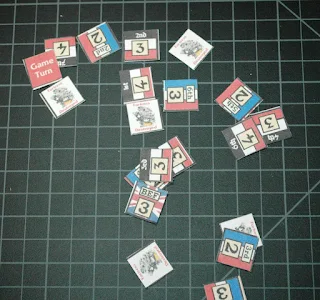
Depending on what you want to do, I carefully cut the counters in strips. Look carefully to see what is the least amount of work using scissors will be. In this case cutting in strips in either direction will be the same amount of work, i.e. scissors cutting. You can use a U.K. or #11 knife if you want, just easier on me to use scissors.
Using a pair of scissors, I cut the counters apart. This is one of the reasons why I use the comic backing board. The counters are thick enough for me and easy to cut out.
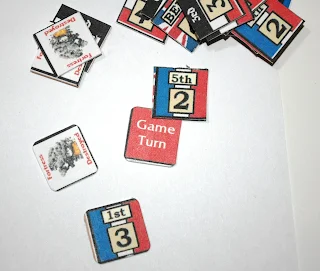
And for the grand finale, clip the counters to round the edges for a more posh look.
You can see what I use
here for rounding the corners. Several sizes are available, I just found that the 2.5mm rounded counter is the best for me as it is good for 1/2" and up to 1" counters.
👉 Take your time, measure twice, cut lightly several times, and above all, be careful.
Yes, lots of warnings, just be careful. Don't be in a rush.
And you too can make your own mounted counters. I like using the comic backing board as it is sturdy enough and thin enough to cut thru with scissors.
Also, make sure you make a copy of those counters you are going to be mounting (BEFORE CUTTING) and use that. That way you still have the original counters in case you lose one. And, yes, this is legal. One can always make a copy for personal use. Just don't copy and give away or sell, that is verboten.
Enjoy and let me know how your mounting project came out!
-ab
This content is accurate and true to the best of the author’s
knowledge and is not meant to substitute for formal and individualized
advice from a qualified professional.
This blog is considered to be a living blog. Changes will be made to it as needed to clarify, correct errors or update with new information. And
I apologize, but this review may contain references to graphics that
are no longer on this blog. Long story, but it was Google who removed them.


